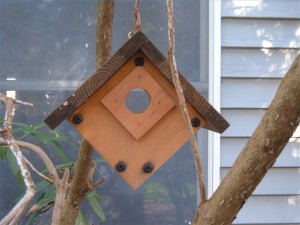
A decorative wooden birdhouse will certainly invite wild visitors to your back yard. In time, they’ll set up housekeeping and provide plenty of activity complete with friendly chatter and territorial challenges.
This hanging wooden birdhouse is attractive, easy to make, and features a clear plastic back for peeking inside at the nest and baby birds. Hang the birdhouse in a protected area within view from a window and watch as the parent birds build their nest, incubate the eggs and feed the babies.
Step 1
Cut the pieces of wood to the following dimensions:
Front (A) – 5½” L x 5 ½” W
Back (B) – 5½” L x 5 ½” W (Plexiglas trimmed to fit)
Sides (C) – 5½” W x 6″ L (Qty of 2 needed)
Side (D) – 4¾” W x 6″ L
Sides (E) – 4″ W x 6″ L
Roof (F) – 7¼” W x 8″ L
Roof (G) – 6 ½” W x 8″ L
Entrance guard – 3″ L x 3″ W (1 ½” diameter entrance hole)
Step 2
Each of the four side sections has a thin 1/8″ wide by ¼” deep groove cut across one end to accept the clear Plexiglas panel. Using the table saw and miter gauge, position the fence with a spacer board to cross cut the groove. Raise the blade ¼” above the table and run each piece through.
Step 3
The sides (C) are beveled along one edge at a 45 degree angle. Fastened together, the two beveled edges form the 90 degree corner at the bottom of the hanging wooden birdhouse. Attach the two side pieces together with weather resistant nails or screws, taking care to line up grooves.
Step 4
Slide the Plexiglas panel into the two side pieces, trimming the panel as needed to fit snugly into the groove. Attach the two remaining sides as outlined in the diagram, taking care to position the side pieces to form a square. Nail or screws the side pieces together, enclosing the clear plastic panel.
Step 5
Mark and drill a 1 ½” hole through the front section and the entrance guard. Position the front section in place, and attach to the sides with nails or screws. Attach the entrance guard on a bias to form a diamond shape, as shown in the photo.
Step 6
Attach the two roof pieces. Hang the finished birdhouse using two galvanized eye bolts, screwed into the roof peak approximately 1 ¾” from each end. Use a short section of reclaimed and stripped copper electrical wire to hang the birdhouse from a tree or pole.
Tips:
- Before building your birdhouse, read these tips in order to make it the best birdhouse on the block!
- Ensure that the birdhouse is sturdy, that rain can’t get in and that there is plenty of ventilation.
- Place the birdhouse in a sheltered area, so that the wind will not come in through the openings.
- Most birdhouses have a small peg just underneath the opening for birds to get into the birdhouse. Don’t worry if the peg becomes damaged and falls off. Birds are able to land in the opening and are still able to use the birdhouse.
- Never place food in the birdhouse, as this will attract insects and predators.
Congratulations, your wood bird house is finished and ready to adorn your yard!
