Build a knife-block to keep your knives useful.
This can be a simple undertaking to get a knife block that takes almost no time. The stop is manufactured out-of red oak which is a sturdy wood that can endure the rigors of the kitchen nicely. Creating your own knife-block is of being sure your entire blades can match it, a method. This is a program that can help you develop a knife-block in a time that is really short.
Create cooking by giving them a knife block which will preserve the required knife handy, easier for the cook in your household.
Construction
Tools required: Sander, router, band sander (optional, but helps with the sanding)
Wood required: (Red Oak)
| Description | Qty | Thickness | Width | Length |
| Main block* | 1 | 3/4″ (19 mm) | 5 1/4″ (133 mm) | 55″ (1397 mm) |
| Main block end | 1 | 1/2″ (13 mm) | 5 1/4″ (133 mm) | 12″ (305 mm) |
| Support block** | 1 | 3/4″ (19 mm) | 3 5/8″ (92 mm) | 18″ (457 mm) |
| Support block end | 1 | 1/2″ (13 mm) | 3 5/8″ (92 mm) | 5 3/4″ (146 mm) |
* This piece of wood will be cut into five equally sized pieces
** This piece of wood will be cut into four equally sized pieces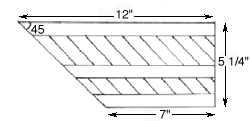
Cut the Main Block plank into five pieces, as shown in the diagram (left). There should be very little waste wood left due to the fact that you can overhang (i.e., angled end against angled end) the pieces. Also use this template to cut out the Main Block End, which is exactly the same size as the Main Block pieces, but thinner.
Each of the Main Block pieces should have two grooves cut into it, as shown in the template. These grooves are 1/4″ (6 mm) deep. The larger groove is 1 3/4″ (45 mm) wide and the smaller one is 1 1/8″ (29 mm) wide. However, the dimensions that you elect to use will depend upon the size of the knives that you wish to store in the block. Even though you may have a random assortment of sizes, try to group them into two rough sizes. This way you can cut out two rows of knife slots that are of regular sizes. If you try to tailor each slot for a particular knife, then putting a number of knives away at a time will quickly turn into a frustrating game as you try and match each slot to the correct knife.
Once you have decided on the two widths — in this case 1 3/4″ (45 mm) and 1 1/8″ (29 mm) — cut out the slots on each Main Block piece. Note that the distance between the slot and the edge of the block should be the same for both sides (see diagram above). Do not cut slots in the Main Block End piece.
Once you have cut all the slots, glue the five Main Block pieces together. At the same time, glue the Main Block End piece to the end of the knife block that has open slots showing, thus balancing the block’s shape. Clamp and glue overnight.
The Supporting Block
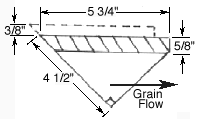
While the main block is gluing cut out the Support Block pieces. Note that there are two templates for the Support Blocks and that two pieces cut to each template are needed (the dotted line in the template shows the cut for the second, flanged, template number two). Once these four pieces have been cut, also cut out the Support Block End piece. This should be cut out in accordance with the smaller template (Support Block One). Note the flow of the grain when cutting out these blocks. This is very important as we want to be able to match the flow of the grain on the main block. The reason why two of the blocks have an extra flange of wood is because these flanges are going to slot into the main block, making a finger joint and thus forming a far more solid construction than would be formed by simply gluing the two blocks together.
Once all five blocks have be cut to shape, make the groove in the four 3/4″ (19 mm) thick pieces (not the End Block). As with the main block, the size of these slots is an individual choice. However, as before, it is far neater — and more practical — if all the slots are the same size. Note too that these slots cannot accommodate large knives as the slots are not very long and this fact should be borne in mind when cutting the slots. This particular knife block has slots that are 5/8″ (16 mm) wide and 1/4″ (6 mm) deep.
Once you have cut all the slots, glue the four Support Block pieces together. At the same time, glue the Support Block End piece to the end of the knife block that has open slots showing, thus balancing the block. Clamp and glue overnight. The resulting combination of templates one and two should produce a support block that has two flanges sticking out — in positions two and four — that will form a tight bond with the main block.
Joining the Two Blocks Together
The Support Block is 3/4″ thinner than the main block. This is so that the smaller block appears less blocky than if it matched the width of the main block. Position the supporting block so that it is indented 3/8″ (9 mm) from each side of the Main Block. Mark the places where the Support Block flanges (fingers) meet the Main Block. These should be at 1 1/8″ to 1 7/8″ (29 mm to 48 mm) and 2 5/8″ to 3 3/8″ (67 mm to 86 mm) from the side of the main block, approximately.
Once you have marked these slots, and doubled-checked to ensure their accuracy for your particular Support Block, rout out these two grooves to a width of 1/2″ (12 mm) — ie a depth equal to the width of the two flanges — and a depth of 3/8″ (9 mm). Once you have done this, glue and clamp the knife block together and leave to dry overnight.
Finally, sand the entire knife block, taking care to round off all of the corners. I personally prefer a more rounded look, so I spent quite a bit of time doing this and used a band sander for the initial rough shaping. The more traditional look is to leave the corners almost intact, with a more subtle rounding-off.
Once sanded to your satisfaction, wax or oil. Oiling is preferable as the oil will soak in, giving a more protective finish. Finally, add four small rubber “feet” to the bottom of the knife block. Although this is not totally necessary, it is advisable as it will avoid the risk of the knife block sitting in a pool of water and subsequently swelling. These rubber feet are available at most home improvement stores for a few pennies. Alternatively, make your own feet out of 1/4″ (6 mm) thick rubber and glue them on.