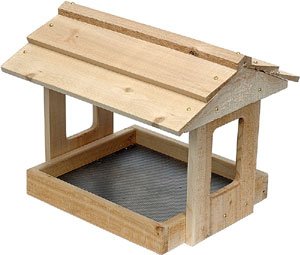
While any materials can be used to make a bird feeder the lap siding should be made from cedar wood. Cedar is resistant to rot and can withstand harsh weather conditions for many years without sealing or painting. All measurements for the bird feeder plans are in inches.
| Construction Materials | |
| Qty. | Lumber |
| 1 | 3/4 x 16 x 16 plywood scrap |
| 1 | 3/4 x 6 stop moulding |
| 1 | 8 x 10 cedar lap siding |
| 1 | 1 x 2 x 8 cedar |
| 1 | 1 diameter x 3 dowel |
| Cutting List | ||||
| Key | Part | Dimension | Pcs. | Material |
| A | Base | 3/4 x 16 x 16 | 1 | Plywood |
| B | Post | 3/4 x 3/4 x 7 1/4 | 4 | Cedar |
| C | Box side | 5/16 x 7 1/4 | 4 | Cedar siding |
| D | Ledge side | 3/4 x 1 1/2 x 17 1/2 | 2 | Cedar |
| E | Ledge end | 3/4 x 1 1/2 x 16 | 2 | Cedar |
| F | Roof panel | 5/16 x 7 1/4 x 20 | 2 | Cedar siding |
| G | Ridge pole | 1 diameter X 20 | 1 | Dowel |
Other Materials
1/4 diameter Threaded, galvanized or brass rod with matching nut and washer
Wood glue
Hot melt glue
4d common nails, rigid acrylic or plastic
The Base
Exterior grade plywood will work really well.
- Cut the plywood base (A) from 3/4″ thick plywood.
- Draw diagonal lines from corner to corner to find the center of the square base.
- Measure and mark a 6 square in the middle of the base. This will be the eventual location of your feeder box.
- Drill a 1/4″ hole through the center of the base.
- Measure in towards centre 3/8″ from each corner of the 6 square and mark each point.
- Drill 1/16″ diameter pilot hoes right through the base.
Feeder Box Preparation
The posts and the box sides will form the walls of the feeder box. The vertical grooves in the box sides will allow you to check the food level. Small arc cuts in the bottom of the box sides controls the flow of food through to the feeding area.
- Cut the posts (B) to size from 3/4 square cedar stop moulding.
- Cut two 6″ wide box sides (C) from 8” cedar lap siding.
- Cut two more panels about 7” wide that will be trimmed to follow the lap-siding bevels.
- Cut a slot in each box side that will be used for viewing. This is achieved by drilling two 1/2” diameter starter holes for a jigsaw blade along the centre of each box side. Make the holes 2” from the top and bottom.
- Connect the starter holes by cutting with a jigsaw to cut the slots.
- Using a jigsaw cut a 1/2” deep arc into the bottom off each box side. Start the cuts 1 1/2” from each end.
- Use a drum sander mounted on a power drill to smooth out the arcs.
- Cut strips of clear acrylic or plastic a little larger than the viewing slots.
- Use hot glue to attach the strips behind the slots on the inside faces of the box sides.
- Tape box sides together into a box shape in order to mark the cutting lines for trimming two box sides to follow the siding bevel. (Wide ends of bevelling should all be flush.)
- Trace the siding profile onto the inside faces of the two box ends.
- Take the box apart and cut along the profile lines using a jigsaw.
Assembling the Feeder Box
- Apply some wood glue to the posts keeping them flush with the inside edges on the box sides. (Clamp until dry)
- Glue the untrimmed box sides to the posts. (Clamp until dry)
Base Frame Installation
Seal edges of the base before attaching the frame.
- Cut the ledge sides (D) and ledge ends (E) from 1 x 2 cedar. (This will be your frame that extends around the base so that the food stays inside the feeder.)
- Glue and attach ledge pieces so bottoms are flush with the floor of the base.
- Use 4d common nails to reinforce the joint.
Attaching the Base
Use a spacer to help align the box square to the base.
- Align the assembled feeder box with the 6” square drawn on the base.
- Using these lines for reference glue the box to the base.
- Turn the assembly upside down.
- Attach the base to the feeder box by driving 4d galvanized common nails through the pre drilled pilot holes in the base and the posts on the feeder box.
Create the Roof
- Cut ridge pole (G) from a 1” diameter dowel.
- Cut roof panels (F) from 8” siding.
- Lay panels on your work surface so the wide ends butt together.
- Slip a 1” thick spacer 2” in from each of the narrow ends to create the roof pitch.
- Apply hot glue into the seam between the panels.
- Press the ridge pole into the seam to reinforce the roof before glue hardens.
- Leave for 15 minutes for glue to harden.
- Set roof down so the ends of the ridge pole each rest on a 2 x 4 block.
- Drill 3/8” diameter holes through the roof and ridge pole, 1” on each side of the mid-point of the ridge.
- Using a jigsaw connect the two holes, cutting on both sides of the holes to create a 2” long slot.
- Cut the 1/4” diameter threaded rod to 16” in length. Use pliers to bend a 1 1/2” diameter loop in one end of the rod.
- Thread the unbent end of the rod through the slot in the roof and the hole in the base.
- Spin the rod loop making it perpendicular to the roof ridge.
- Tighten a washer and nut onto the end of the rod. (Make it loose enough that the loop can be spun with moderate effort.)
Touch-ups
- Sand surfaces until smooth.
- You can leave it natural or apply a finish of your choice that is not toxic to birds
If you’ve followed these bird feeder plans to a tee, then you’ll be making a lot of birds very happy.