Have you ever come across a website that offers building Woodworking DIY plans but have no idea how to use them? Well, this complete guide on using Woodworking DIY plans on a website is here to help you. In this article, we will provide you with a step-by-step approach on using the Woodworking DIY plans available on a website to build your project.
Before we delve into the details, it is important to note that the Woodworking DIY plans on websites are essential to the DIY community. The Woodworking DIY plans will have information ranging from the cutting list, fastener PDF, optimized cutting sheets, and CAD files to help you execute your project efficiently.
Let’s get started and take a look at the programs required and how to open the files. You will need to have the following programs on your computer: Winzip, Adobe Reader, and SketchUp. These programs are essential in opening and using all the files available on the website.
Once you have these programs installed, the next step is to download and decompress the files. After decompressing the files, you may need to change the measurements from millimeters to inches based on your preference.
So, what’s next? The tutorial will take you through the process of viewing the cutting list, fastener PDF, and optimized cutting sheet for each board. Additionally, we will guide you on how to import the Excel file and open the project on MaxCut. The instruction folder has PDF files and links with information on how to build the project. These links are essential to guide you through the building process.
Furthermore, we will explain how to use the printable templates in the “PDF Woodworking DIY plans” folder and how to open the CAD files using Autocad or SketchUp. Moreover, we will give you insights on how to import some Woodworking DIY plans into CAM programs to machine them with a CNC.
After downloading the Woodworking DIY plans, it is essential to familiarize yourself with the Woodworking DIY plans, print out the files, find the materials and fasteners, and watch the videos for more measurements. In the end, the tutorial will explain how to download free Woodworking DIY plans from the website, register your account, and download the Woodworking DIY plans from the user profile.
With this guide, you are now ready to start executing your project using the Woodworking DIY plans available on the website. Stay tuned for more information on getting started with the programs required and opening the files.
Getting Started: Programs Required and Opening Files
If you are planning on building a project using Woodworking DIY plans that you have found on a website, there are certain programs that you will likely need to be able to open and use all of the files. Some of the required programs include Winzip, Adobe Reader, and SketchUp. Fortunately, most of these programs can be downloaded and used for free, so you do not need to purchase any expensive software to get started.
In order to begin using your Woodworking DIY plans, you first need to download the files and decompress them. This can typically be done by right-clicking on the downloaded file and selecting “Extract All” or a similar option, depending on your computer’s operating system. Once you have the files extracted, you can begin to work with them in the appropriate programs.
It is also important to make sure that you are using the correct measurements for your project. Some Woodworking DIY plans may be formatted in millimeters, while others may use inches. It is important to be aware of these differences and to adjust your measurements accordingly in order to ensure accuracy.
Once you have all of the necessary programs installed and have downloaded the files, you can start to explore the various components of the Woodworking DIY plans. This might include viewing the cutting list, fastener PDF, and optimized cutting sheet for each board. In addition, you may be able to import the Excel file for the project into MaxCut or a similar program in order to optimize your material usage and minimize waste.
It is also important to take some time to browse the instruction folder for the project, which will typically contain additional PDF files or links to more information on how to build the project. This can be a valuable resource in helping you to understand the project requirements and to plan your build accordingly.
If you need to work with printable templates, you can typically find these in the “PDF Woodworking DIY plans” folder. Similarly, if there are CAD files available for the project, you can open these using Autocad or SketchUp (depending on the file format) in order to view the project in three dimensions.
For those with access to CAM programs and CNC machines, some Woodworking DIY plans may be suitable for machining directly from the Woodworking DIY plans. This can allow for highly precise and automated machining of the project components.
Once you have all of the necessary files and programs installed, it is important to take some time to familiarize yourself with the Woodworking DIY plans and to plan out your build. This might include printing out copies of the files, sourcing the necessary materials and fasteners, and watching related videos for additional tips and advice.
If you are looking for more Woodworking DIY plans, many websites offer free Woodworking DIY plans for a variety of projects that you can download and use. In order to access these free Woodworking DIY plans, you may need to create an account or sign up for a newsletter.
In conclusion, getting started with using Woodworking DIY plans on a website can be a bit daunting at first, but with some patience and practice, it is possible to successfully build a wide range of projects using downloaded Woodworking DIY plans and instructions. By following the steps outlined in this chapter, you can ensure that you have all of the necessary programs and files, and that you are able to open and use each of these components effectively.
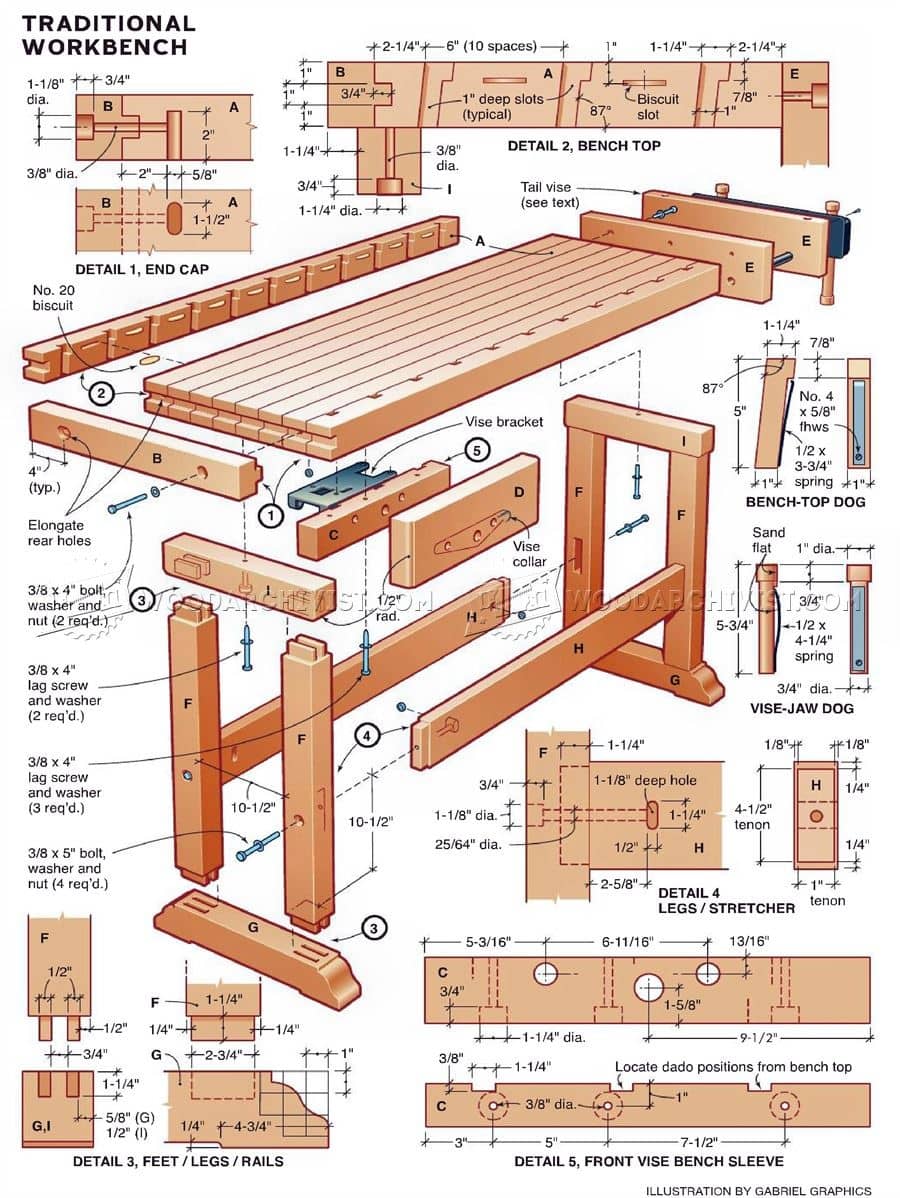
Using the Woodworking DIY plans: View Cutting List, Fastener PDF, and Optimized Cutting Sheet
When it comes to using Woodworking DIY plans on a website, each set of Woodworking DIY plans usually includes a few different files that make up the entire project. One of the most important files in a plan set is the cutting list, which lists all the pieces required to construct the project. In addition to the cutting list, there may also be a fastener PDF and an optimized cutting sheet.
Viewing the Cutting List
The cutting list is typically an Excel file that can be opened with Microsoft Excel or a free program like LibreOffice or Google Sheets. Once the Excel file is open, the user can see all of the materials required for the project, including dimensions and quantities. Some cutting lists may even include extra information such as the type of wood needed or the grade of plywood required.
Viewing the Fastener PDF
The fastener PDF is often a separate file that lists all of the screws, nails, and other fasteners needed for the project along with their sizes and quantities. This file is especially useful for those who may not be accustomed to working with hardware and need a visual guide for purchasing everything needed to complete the project.
Viewing the Optimized Cutting Sheet
An optimized cutting sheet is a PDF file that shows how the material can be cut for maximum efficiency. It provides an outline of the wood pieces and shows how they can be arranged on a sheet of plywood with minimal waste. This is especially useful for those who are purchasing large sheets of wood or who want to minimize waste.
Importing the Excel File and Opening the Project
Once the cutting list is viewed, the user can then proceed to importing the Excel file to a program like MaxCut that will help layout the cuts with optimization. This is especially useful for limiting waste and speeding the overall cutting process. Once the project file is open, the user can then proceed to follow the instructions found in the instruction folder, complete with PDF files and links.
Using Printable Templates and CAD Files
Many Woodworking DIY plans on a website also include printable templates in the “PDF Woodworking DIY plans” folder and CAD files that can be opened in Autocad or SketchUp. These templates and models give the user a visual representation of the project and can be very helpful when developing an understanding of how the final product will look.
Advanced Techniques: Importing into CAM Programs and CNC Machining
For those who have experience in Computer-Aided Manufacturing (CAM), the Woodworking DIY plans can often be imported for machining by a CNC, making the process of building faster and more precise. For those who are unfamiliar with these advanced techniques, it is usually best to try to build the project with standard equipment.
Next Steps: Downloading Free Woodworking DIY plans and Final Thoughts
Once familiar with using Woodworking DIY plans on a website, the next step is to familiarize oneself with the different types of Woodworking DIY plans available, including the many free Woodworking DIY plans available across the web. With registered access one can browse an extensive library of Woodworking DIY plans for projects such as furniture, sheds, decks, birdhouses and much more. Finally, remember to take the time to watch additional videos or tutorials to make each project come out perfectly.
Advanced Techniques: Importing into CAM Programs and CNC Machining
If you’re looking to take your woodworking skills to the next level, importing Woodworking DIY plans into CAM (computer-aided manufacturing) software could be the key to unlock more advanced projects. CAM allows for 3D modeling and simulation of cutting paths, which can help take the guesswork out of creating intricate designs. In this chapter, we’ll walk through the process of importing Woodworking DIY plans into CAM software and then generating CNC (computer numerical control) code to machine the project.
Step 1: Choosing CAM software
There are many CAM software options, ranging from free open-source programs to professional-grade software that can cost thousands of dollars. Some popular options include Fusion 360, Vectric Aspire, and Autodesk PowerMill. While it’s worth investing in a good CAM program if you plan on doing a lot of CNC machining, for this example we’ll use Easel by Inventables. Easel offers a free plan and is user-friendly even for beginners.
Step 2: Creating a project in Easel
Once you’ve created an account with Easel, you can begin a new project and import your Woodworking DIY plans. Easel accepts a variety of file formats, including SVG, DXF, and PDF. Once your Woodworking DIY plans are imported, you can use the software to create tool paths for each piece of the project. Tool paths are essentially a series of instructions telling the CNC machine where to move and how much material to remove at each step.
Step 3: Generating CNC code
After creating your tool paths, you’ll need to generate CNC code that the machine can interpret. In Easel, this is as simple as clicking “carve” and following the prompts. It’s important to double-check your settings, especially the cutting depth and feed rate, to make sure you’re not removing too much material at once or moving too quickly, which could cause the wood to splinter or even break. Once the CNC code is generated, you can save it to a USB drive and insert the drive into the CNC machine.
Step 4: Machining the project
After loading the CNC code into the machine’s software, you’re ready to begin machining. It’s important to follow the manufacturer’s instructions, including proper safety precautions and regularly monitoring the progress of the project. Depending on the complexity of the design, machining could take anywhere from a few minutes to several hours. Once the project is finished, make sure to carefully remove it from the machine and sand any rough edges or surfaces.
Importing Woodworking DIY plans into CAM software and machining them with a CNC machine may seem intimidating at first, but with practice it can become a valuable tool in any woodworker’s arsenal. Just remember to take your time, double-check your settings, and always prioritize safety. With these advanced techniques in your toolbox, you’ll be able to take your woodworking to the next level.
Next Steps: Downloading Free Woodworking DIY plans and Final Thoughts
Now that you have learned everything there is to know about using Woodworking DIY plans on a website, it’s time to take the next steps towards building your projects. One of the best parts of using Woodworking DIY plans on a website is that many of them are offered for free, so you can start building your projects without paying a dime.
First, you will need to register for an account on the website that offers the Woodworking DIY plans you are interested in. This will usually involve providing your name, email address, and a password. After you have created your account, you can start browsing the available Woodworking DIY plans on the website.
Many websites will offer a wide variety of Woodworking DIY plans, so take some time to browse through them and find the ones that interest you the most. Some sites may have Woodworking DIY plans organized by project type, while others may have Woodworking DIY plans organized by skill level or by the tools required to complete the project.
Once you have found the Woodworking DIY plans you want to use, simply download them to your computer. This will usually involve clicking a download button or link and saving the Woodworking DIY plans to your hard drive. Some Woodworking DIY plans may be compressed in a ZIP file, so you may need to use a tool like WinZip to extract the files before you can use them.
With the Woodworking DIY plans downloaded to your computer, you can start reviewing them to get a better idea of the tools and materials you will need to complete the project. Take some time to review the cutting list and fastener PDF to make sure you have everything you need before you start building.
Before you start building, it is important to become familiar with the Woodworking DIY plans and to watch any videos that are available. This will give you a better understanding of the project and help ensure that you complete it successfully.
It is also a good idea to print out the Woodworking DIY plans and keep them handy while you are building. This will make it easier to refer to the Woodworking DIY plans as you work, and will help ensure that you are building the project correctly.
Finally, it is important to take your time and to enjoy the process of building your project. Remember that building something yourself can be a very rewarding experience, and that the finished product will be something that you can be proud of.
Overall, using Woodworking DIY plans on a website is a great way to get started with woodworking or to expand your skills. By following the steps outlined in this guide, you can start building your own projects today.
Thank you for reading this guide on using Woodworking DIY plans on a website. We hope you found it useful and that it has helped you in your woodworking journey.